Senin, 01 Juni 2015
coffee-script offline install 100% work
Tidak ada komentar:
Label:
Apache Cordova,
cordova offline,
expressjs offline,
expressjs-generator offline,
generator,
grunt offline,
ionic offline installer,
update cordova offline,
yo offline
coffee-script
Unfancy JavaScript
        {
     }   }   {
    {   {  }  }
     }   }{  {
    {  }{  }  }                    _____       __  __
   { }{ }{  { }                   / ____|     / _|/ _|
 .- { { }  { }} -.               | |     ___ | |_| |_ ___  ___
(  { } { } { } }  )              | |    / _ \|  _|  _/ _ \/ _ \
|`-..________ ..-'|              | |___| (_) | | | ||  __/  __/
|                 |               \_____\___/|_| |_| \___|\___|
|                 ;--.
|                (__  \            _____           _       _
|                 | )  )          / ____|         (_)     | |
|                 |/  /          | (___   ___ _ __ _ _ __ | |_
|                 (  /            \___ \ / __| '__| | '_ \| __|
|                 |/              ____) | (__| |  | | |_) | |_
|                 |              |_____/ \___|_|  |_| .__/ \__|
 `-.._________..-'                                  | |
                                                    |_|
Installation
If you have the node package manager, npm, installed:coffee_run.zip
Leave off the
-g if you don't wish to install globally. If you don't wish to use npm:
Getting Started
Execute a script:
coffee /path/to/script.coffee
coffee -c /path/to/script.coffee
To suggest a feature or report a bug: http://github.com/jashkenas/coffeescript/issues
ionic offline installer 100% work
Tidak ada komentar:
Label:
Apache Cordova,
API JavaScript,
HTML5 kerangka,
interaksi UI,
ionic offline installer,
offline,
offline phonegap,
pengembang aplikasi,
phonegap installer,
Tak Berkategori
A tool for creating and developing Ionic Framework mobile apps.
The Ionic Framework command line utility makes it easy to start, build, run, and emulate Ionic apps. In the future, it will also have support for our mobile development services and tools that make Ionic even more powerful.
Use the
Starter templates can either come from a named template, a Github repo, a Codepen, or a local directory. A starter template is what becomes the
Named template starters:
Github Repo starters:
Codepen URL starters:
Plunker URL starters:
Use
The
With live reload enabled, an app's console logs can also be printed to the terminal/command prompt by including the
Command-line flags/options for
While the server is running for live reload, you can use the following commands within the CLI:
Deploys the Ionic app on specified platform emulator. This is simply an alias for
Deploys the Ionic app on specified platform devices. If a device is not found it'll then deploy to an emulator/simulator.
Automatically generate icons and splash screens from source images to create each size needed for each platform, in addition to copying each resized and cropped image into each platform's resources directory. Source images can either be a
Since each platform has different image requirements, it's best to make a source image for the largest size needed, and let the CLI do all the resizing, cropping and copying for you. Newly generated images will be placed in the
During the build process, Cordova (v3.6 or later) will look through the project's config.xml file and copy the newly created resource images to the platform's specific resource folder. For example, Android's resource folder can be found in
Save an
Save a
To generate both icons and splash screens, follow the instructions above and run:
One source image can be used to generate images for each platform by placing the file within the
By default the
Ionic provides you some default icons and splash screens to give you a better idea of how to size your icons and splashscreen, as well as how to modify your config.xml file for your own icons.
If you already have a resources directory, the command above will not over write your files. If you wish to force an over write, use
When starting a new app and adding a platform
In v1.3.0 and later, you can now specify which browser to use in your Cordova Android projects. Currently we only support Crosswalk and have plans to support more browsers later.
Execute
If you'd like to specify a different version of Crosswalk, run
All that is left is to run the project as normal -
If you'd like to build without Crosswalk for Android SDK 21 or later, do the following:
Go to Page
Downloads Package
How to Download & Install
Use the
ionic --help command for more detailed task information.tarting an Ionic App
$ ionic start myapp [template]
Starter templates can either come from a named template, a Github repo, a Codepen, or a local directory. A starter template is what becomes the
www directory within the Cordova project.Named template starters:
- tabs (Default)
- sidemenu
- maps
- salesforce
- tests
- complex-list
- blank
Github Repo starters:
- Any Github repo url, ex: https://github.com/driftyco/ionic-starter-tabs
- Named templates are simply aliases to Ionic starter repos
Codepen URL starters:
- Any Codepen url, ex: http://codepen.io/ionic/pen/odqCz
- Ionic Codepen Demos
Plunker URL starters:
- Any Plunker url, ex: http://embed.plnkr.co/dFvL8n/preview
- Relative or absolute path to a local directory
[--appname|-a]  .......  Human readable name for the app
                         (Use quotes around the name)
[--id|-i]  ............  Package name set in the <widget id> config
                         ex: com.mycompany.myapp
[--no-cordova|-w]  ....  Do not create an app targeted for Cordova
[--sass|-s] ...........  Setup the project to use Sass CSS precompiling
[--list|-l]  ..........  List starter templates available

[--io-app-id] .........  The Ionic.io app ID to use
Adding a platform target
$ ionic platform ios android
Testing in a Browser
Use
ionic serve to start a local development server for app dev and testing. This is useful for both desktop browser testing, and to test within a device browser which is connected to the same network. Additionally, this command starts LiveReload which is used to monitor changes in the file system. As soon as you save a file the browser is refreshed automatically. View Using Sass if you would also like to have ionic serve watch the project's Sass files.
$ ionic serve [options]
Building your app
$ ionic build ios
Live Reload App During Development (beta)
The
run or emulate command will deploy the app to the specified platform devices/emulators. You can also run live reload on the specified platform device by adding the --livereload option. The live reload functionality is similar to ionic serve, but instead of developing and debugging an app using a standard browser, the compiled hybrid app itself is watching for any changes to its files and reloading the app when needed. This reduces the requirement to constantly rebuild the app for small changes. However, any changes to plugins will still require a full rebuild. For live reload to work, the dev machine and device must be on the same local network, and the device must support web sockets.With live reload enabled, an app's console logs can also be printed to the terminal/command prompt by including the
--consolelogs or -c option. Additionally, the development server's request logs can be printed out using --serverlogs or -s options.Command-line flags/options for
run and emulate:[--livereload|-l] ....... Live Reload app dev files from the device (beta)
[--consolelogs|-c] ...... Print app console logs to Ionic CLI (live reload req.)
[--serverlogs|-s] ....... Print dev server logs to Ionic CLI (live reload req.)
[--port|-p] ............. Dev server HTTP port (8100 default, live reload req.)
[--livereload-port|-i] .. Live Reload port (35729 default, live reload req.)
[--all|-a] .............. Specify to run on all addresses, 0.0.0.0, so you can view externally
[--browser|-w] .......... Specifies the browser to use (safari, firefox, chrome)
[--browseroption|-o] .... Specifies a path to open to (/#/tab/dash)
[--debug|--release]While the server is running for live reload, you can use the following commands within the CLI:
restart or r to restart the client app from the root
goto or g and a url to have the app navigate to the given url
consolelogs or c to enable/disable console log output
serverlogs or s to enable/disable server log output
quit or q to shutdown the server and exit
Emulating your app
Deploys the Ionic app on specified platform emulator. This is simply an alias for
run --emulator.
$ ionic emulate ios [options]
Running your app
Deploys the Ionic app on specified platform devices. If a device is not found it'll then deploy to an emulator/simulator.
$ ionic run ios [options]
Icon and Splash Screen Image Generation
Automatically generate icons and splash screens from source images to create each size needed for each platform, in addition to copying each resized and cropped image into each platform's resources directory. Source images can either be a
png, psd Photoshop or ai Illustrator file. Images are generated using Ionic's image resizing and cropping server, instead of requiring special libraries and plugins to be installed locally.Since each platform has different image requirements, it's best to make a source image for the largest size needed, and let the CLI do all the resizing, cropping and copying for you. Newly generated images will be placed in the
resources directory at the root of the Cordova project. Additionally, the CLI will update and add the correct <platform> configs to the project's config.xml file.During the build process, Cordova (v3.6 or later) will look through the project's config.xml file and copy the newly created resource images to the platform's specific resource folder. For example, Android's resource folder can be found in
platforms/android/res, and iOS uses platforms/ios/APP_NAME/Resources.Icon Source Image
Save an
icon.png, icon.psd or icon.ai file within the resources directory at the root of the Cordova project. The icon image's minimum dimensions should be 192x192 px, and should have no rounded corners. Note that each platform will apply it's own mask and effects to the icons. For example, iOS will automatically apply it's custom rounded corners, so the source file should not already come with rounded corners. This Photoshop icon template provides the recommended size and guidelines of the artwork's safe zone.
$ ionic resources --icon
Splash Screen Source Image
Save a
splash.png, splash.psd or splash.ai file within the resources directory at the root of the Cordova project. Splash screen dimensions vary for each platform, device and orientation, so a square source image is required the generate each of various sizes. The source image's minimum dimensions should be 2208x2208 px, and its artwork should be centered within the square, knowning that each generated image will be center cropped into landscape and portait images. The splash screen's artwork should roughly fit within a center square (1200x1200 px). This Photoshop splash screen template provides the recommended size and guidelines of the artwork's safe zone. Additionally, when the Orientation preference config is set to either landscape or portrait mode, then only the necessary images will be generated.
$ ionic resources --splash
Generating Icons and Splash Screens
To generate both icons and splash screens, follow the instructions above and run:
$ ionic resources
Platform Specific Resource Images
One source image can be used to generate images for each platform by placing the file within the
resources directory, such as resources/icon.png. To use different source images for individual platforms, place the source image in the respective platform's directory. For example, to use a different icon for Android, it should follow this path: resources/android/icon.png, and a different image for iOS would use this path: resources/ios/icon.png.Generating Exact Platform Resources
By default the
ionic resources command will automatically figure out which platforms it should generate according to what platforms have been added to your project. However, you can also explicitly state which resources should be built by providing a platform name in the command. The example below would generate only ios resources (even if the platform hasn't been added to the project).
$ ionic resources ios
Default Ionic Resources
Ionic provides you some default icons and splash screens to give you a better idea of how to size your icons and splashscreen, as well as how to modify your config.xml file for your own icons.
$ ionic resources --default
If you already have a resources directory, the command above will not over write your files. If you wish to force an over write, use
ionic resources --default --force.When starting a new app and adding a platform
ionic platform add ios - the default icons and splashscreens will be downloaded and your config.xml will be modified to set up the default resources. This should help you identify your Ionic apps easier as well as help you get the file structure and configuration correct.Crosswalk for Android
In v1.3.0 and later, you can now specify which browser to use in your Cordova Android projects. Currently we only support Crosswalk and have plans to support more browsers later.
Execute
ionic browser add crosswalk to add the Crosswalk browser to your Android project. By default, this will install the 12.41.296.5 version of Crosswalk.If you'd like to specify a different version of Crosswalk, run
ionic browser list to see which browsers are available and what versions. Then run ionic browser add crosswalk@10.39.235.15.All that is left is to run the project as normal -
ionic run android.If you'd like to build without Crosswalk for Android SDK 21 or later, do the following:
ionic browser revert android
ionic build android --release -- --minSdkVersion 21
Go to Page
Downloads Package
How to Download & Install
Phonehap install offline work 100%
Tidak ada komentar:
Label:
Apache Cordova,
API JavaScript,
cordova offline,
interaksi UI,
pengembang aplikasi,
phonegap installer,
Tak Berkategori
PhoneGap command-line interface and node.js library.
Command-line
Requirements
- Install node.js version
>=0.10.x - Install ios-sim to deploy apps to the iOS simulator.
Install
$ npm install -g phonegapGetting Started
$ phonegap create my-app    # create a PhoneGap project
$ cd my-app                 # change to project directory
$ phonegap run ios          # build and install the app to iOS
Usage
Usage: phonegap [options] [commands]

Description:

  PhoneGap command-line tool.

Commands:

  create <path>        create a phonegap project
  build <platform>     build the project for specific platform
  install <platform>   install the project on a specific platform
  run <platform>       build and install the projectfor specific platform
  serve                serve a phonegap project
  local [command]      development on local system
  remote [command]     development in cloud with phonegap/build
  platform [command]   update a platform version
  help [command]       output usage information
  version              output version number

Options:

  -d, --verbose        allow verbose output
  -v, --version        output version number
  -h, --help           output usage information

Platforms:

  keyword            | local environment | remote environment
  -------------------|-------------------|-------------------
  android            | ✔                 | ✔
  blackberry10       | ✔                 | ✖
  ios                | ✔                 | ✔
  wp8                | ✔                 | ✔


Examples:

  $ phonegap help create
  $ phonegap help remote build
  $ phonegap create path/to/my-app
  $ phonegap remote build android
Local Usage
Usage: phonegap local [command]

Description:

  Executes the command on the local system.

  This requires that platform SDK is correctly installed.

Commands:

  build <platform>     build a specific platform
  install <platform>   install a specific platform
  run <platform>       build and install a specific platform
  plugin <command>     add, remove, and list plugins

Examples:

  $ phonegap local build android
  $ phonegap local run android
  $ phonegap local plugin list
Remote Usage
Usage: phonegap remote [command]

Description:

  Executes the command remotely using the cloud-based PhoneGap/Build service.

Commands:

  login                login to PhoneGap/Build
  logout               logout of PhoneGap/Build
  build <platform>     build a specific platform
  install <platform>   install a specific platform
  run <platform>       build and install a specific platform

Examples:

  $ phonegap remote login
  $ phonegap remote build android
  $ phonegap remote run android
Node Library
Usage
var phonegap = require('phonegap');App Templates
Templates allow you to create a new app from an existing app template. The nice part about templates is that they are simply a Cordova-compatible app. Any existing app can be a template.
You can list the available templates with:
$ phonegap template listYou can create a new project from a template with:
$ phonegap create my-app --template hello-worldGo to Page
Downloads Package
How to Download & Install
cordova install offline work 100%
Tidak ada komentar:
Label:
Apache Cordova,
API JavaScript,
cordova offline,
HTML5 kerangka,
interaksi UI,
pengembang aplikasi,
Tak Berkategori,
update cordova offline
Cordova command line interface tool
The command line tool to build, deploy and manage Cordova-based applications.
Apache Cordova allows for building native mobile applications using HTML, CSS and JavaScript. This tool helps with management of multi-platform Cordova applications as well as Cordova plugin integration.
Check out the Getting Started guides for more details on how to work with Cordova sub-projects.
Supported Cordova Platforms
- Amazon Fire OS
- Android
- BlackBerry 10
- iOS
- Ubuntu
- Windows Phone 8
- Windows 8
Requirements
- Node.js
- SDKs for each platform you wish to support:
- Android: Android SDK - NOTE This tool will not work unless you have the absolute latest updates for all Android SDK components. Also you will need the SDK's
toolsandplatform-toolsdirectories on your system path otherwise Android support will fail. - amazon-fireos: Amazon Fire OS SDK - NOTE This tool will not work unless you have Android SDK installed and paths are updated as mentioned above. In addition you need to install AmazonWebView SDK and copy awv_interface.jar on Mac/Linux system to ~/.cordova/lib/commonlibs folder or on Windows %USERPROFILE%/.cordova/lib/coomonlibs. If commonlibs folder does not exist then create one.
- Windows Phone SDK - NOTE This tool will not work unless you have
msbuildon your system path otherwise Windows Phone support will fail (msbuild.exeis generally located inC:\Windows\Microsoft.NET\Framework\v4.0.30319). - BlackBerry 10: BlackBerry 10 WebWorks SDK. Make sure you have the
dependencies/tools/binfolder inside the SDK directory added to your path! - iOS: iOS SDK with the latest
XcodeandXcode Command Line Tools - Windows Phone: Windows Phone SDK - NOTE This tool will not work unless you have
msbuildon your system path otherwise Windows Phone support will fail (msbuild.exeis generally located inC:\Windows\Microsoft.NET\Framework\v4.0.30319).
- Android: Android SDK - NOTE This tool will not work unless you have the absolute latest updates for all Android SDK components. Also you will need the SDK's
cordova-cli has been tested on Mac OS X, Linux, Windows 7, and Windows 8.Please note that some platforms have OS restrictions. For example, you cannot build for Windows 8 or Windows Phone 8 on Mac OS X, nor can you build for iOS on Windows.
bower install offline downloads
Tidak ada komentar:
Label:
API JavaScript,
bower install,
HTML5 kerangka,
offline,
pengembang aplikasi,
Tak Berkategori
Usage
See complete command line reference at bower.io/docs/api/
Installing packages and dependencies
# install dependencies listed in bower.json
$ bower install
# install a package and add it to bower.json
$ bower install <package> --save
# install specific version of a package and add it to bower.json
$ bower install <package>#<version> --save
Using packages
We discourage using bower components statically for performance and security reasons (if component has an
upload.php file that is not ignored, that can be easily exploited to do malicious stuff).The best approach is to process components installed by bower with build tool (like Grunt or gulp), and serve them concatenated or using module loader (like RequireJS).
Uninstalling packages
To uninstall a locally installed package:
$ bower uninstall <package-name>
prezto and oh-my-zsh users
On
prezto or oh-my-zsh, do not forget to alias bower='noglob bower' or bower install jquery\#1.9.1Running commands with sudo
Bower is a user command, there is no need to execute it with superuser permissions. However, if you still want to run commands with sudo, use
--allow-root option.Windows users
To use Bower on Windows, you must install msysgit correctly. Be sure to check the option shown below:

Note that if you use TortoiseGit and if Bower keeps asking for your SSH password, you should add the following environment variable:
GIT_SSH - C:\Program Files\TortoiseGit\bin\TortoisePlink.exe. Adjust the TortoisePlink path if needed.Configuration
Bower can be configured using JSON in a
.bowerrc file. Read over available options at bower.io/docs/config.Completion (experimental)
NOTE: Completion is still not implemented for the 1.0.0 release
Bower now has an experimental
completion command that is based on, and works similarly to the npm completion. It is not available for Windows users.This command will output a Bash / ZSH script to put into your
~/.bashrc, ~/.bash_profile, or ~/.zshrc file.$ bower completion >> ~/.bash_profile
Support
- StackOverflow
- Mailinglist - twitter-bower@googlegroups.com
- #bower on Freenode
Contributing
We welcome contributions of all kinds from anyone. Please take a moment to review the guidelines for contributing.
Note that on Windows for tests to pass you need to configure Git before cloning:
git config --global core.autocrlf input
Bower Team
Bower is made by lots of people across the globe, contributions large and small. Our thanks to everyone who has played a part.
Core team
Bower Alumni
License
Copyright (c) 2015 Twitter and other contributors
Licensed under the MIT License
Go to Page
Downloads Package
How to Download & Install
yo offline installer and runing download
Tidak ada komentar:
Label:
API JavaScript,
aplikasi,
HTML5 kerangka,
interaksi UI,
offline,
pengembang aplikasi,
Tak Berkategori,
yo offline
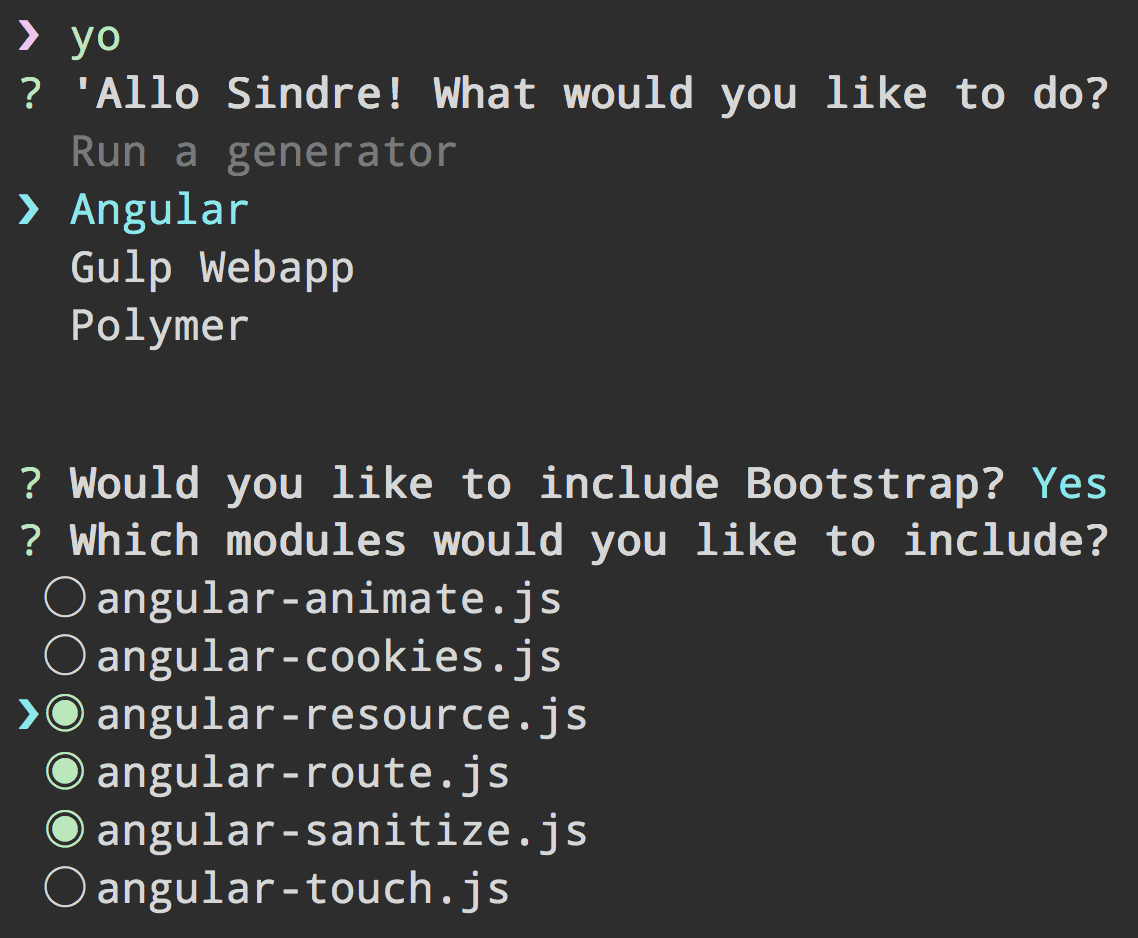
CLI tool for running Yeoman generators
▂▂╱▔▔▔▔▔▔▔▔▔▔╲
╲▂┈╭╮╱╱╭┳━━━╮▕
┈┈▏┃╰╮╭╯┃╭━╮┃▕
┈┈▏╰╮╰╯╭┫┃╱┃┃▕
┈┈▏╱╰╮╭╯┃┃╱┃┃▕
┈┈▏╱╱┃┃╱┃╰━╯┃▕
┈┈▏╱╱╰╯╱╰━━━╯▕
┈┈╲▂▂▂▂▂▂▂▂▂▂╱


CLI tool for running Yeoman generators
Documentation
Options
--no-colorDisable colors.--versionPrint the currentyoversion.--helpPrintyohelp menu with the list of found generators.--[no-]insightto toggle anonymous Insight tracking which helps us improve Yeoman. Using either of these flags on the first run will prevent you from being prompted about it interactively. The flags can also be used to change it later on.--generatorsPrint available generators.
Troubleshooting
Running
yo doctor command can help you troubleshoot common issues.If
doctor doesn't help, then check opened issues for a similar problem. Open a new issue if your problem haven't been reported yet. Make sure to always include the version of yo (yo --version) and Node.js (node --version) you use.If your issue only occurs using a generator, please report the issues on the generator's repository.
Contribute
See the contributing docs.
Changelog
See the release page.
License
BSD-2-Clause © Google
Go to Page
Downloads Package
How to Download & Install
grunt & grunt-cli offline download
Tidak ada komentar:
Label:
API JavaScript,
download,
grunt offline,
grunt-cli offline,
HTML5 kerangka,
offline,
pengembang aplikasi,
Tak Berkategori
The grunt command line interface.
Install this globally and you'll have access to the
grunt command anywhere on your system.npm install -g grunt-cli
Note: The job of the
grunt command is to load and run the version of Grunt you have installed locally to your project, irrespective of its version. Starting with Grunt v0.4, you should never install Grunt itself globally. For more information about why, please read this.See the Getting Started guide for more information.
Shell tab auto-completion
To enable tab auto-completion for Grunt, add one of the following lines to your
~/.bashrc or ~/.zshrc file.# Bash, ~/.bashrc
eval "$(grunt --completion=bash)"
# Zsh, ~/.zshrc
eval "$(grunt --completion=zsh)"
Installing grunt-cli locally
If you prefer the idiomatic Node.js method to get started with a project (
npm install && npm test) then install grunt-cli locally with npm install grunt-cli --save-dev. Then add a script to your package.json to run the associated grunt command: "scripts": { "test": "grunt test" }. Now npm test will use the locally installed ./node_modules/.bin/grunt executable to run your Grunt commands.Go to Page
Downloads Package
How to Download & Install
Langganan:
Komentar (Atom)


